
Pajama pants are the perfect project for teaching yourself to sew clothes.

Just before we get to the good stuff, I want to tell you the reasons why I think pajama pants are THE perfect beginners project for those who want to sew children's clothing, some of these even apply to starting out sewing adults clothing. And here are the reasons:
- You cant really get it wrong. PJ pants only have a few seams, and because the style is baggy your mistakes are easily covered.
- Cutting accuracy is not important.
- Seam allowance accuracy is not important.
- You wear PJs at home, meaning no pressure that they have to be wearable in public.
- They are a fast project.
- I guarantee that when you finish you will feel a sense of accomplishment, you have actually made something your child can wear.
- Fabric is cheap and it doesn't really matter what type you choose. Again, the baggy style means that you could sew these up in just about anything, such as non-stretch cottons such as traditional flannelette, or even stretch material like an old t-shirt that your hubby doesn't wear anymore. You could even use an old pair of tracksuit pants, or even a light cotton, depending on what you want to use them for.
- I can vouch for my pattern here, I sewed this mostly without pins. This means that the pattern is accurate and you aren't going to have to deal with pattern mistakes (which are hard to deal with as a beginner, generally beginners blame their own sewing ability when it may have been an inaccurate pattern, but how would they know the difference?).
Can you see my point here? I am not saying that you don't at least try to cut and sew accurately, but if you are a beginner just starting out, your beginner mistakes are hardly noticeable in the end result.
For all of the reasons above this is also an awesome sewjo pick me up! (We all need one of those sometimes.)
Pajama Pants Pattern and Tutorial
Updated - 26/02/2014This pattern has had an update. It has been reformatted to include layers. When you open the PDF file, you will see the sizes listed and can select or deselect sizes for printing. A big shout of praise to Laura from Titchy Threads who has brought the use layers to the PDF pattern community, and it is an incredible feature in her patterns.
Click here to download the pattern.
In return for downloading the pattern, I ask that you please sign up to my newsletter.
Follow this link to view what the testers for this pattern made.
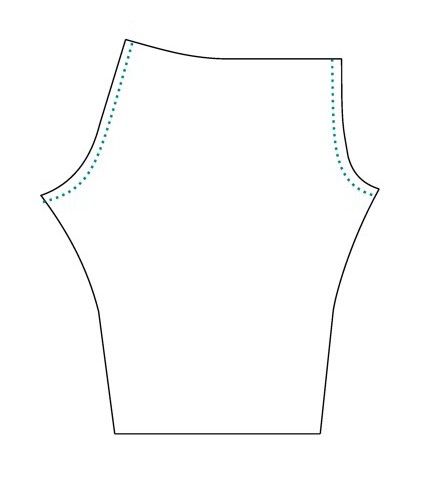
This pattern is a one-piece pants pattern, drafted to sit lower on the hip. It is a pet peeve of mine that my toddler's PJ pants always end up coming off, because as toddlers run around, the high drafted waist ends up falling down to their natural hip, then the pants get tugged around their ankles and they get pulled off naturally as the toddlers walk on the excess fabric at their feet. Anyone else have this issue?
Seam allowances are 3/8" or 1cm in the front and back rise, as well as the inside leg. The hem is 2", so 1" folded twice, and the waistband is 1/2" then a 1" fold.
Sizing is as follows:
| Size | Height | Inside Leg |
| 18 m | 86cm / 34" | 34.5cm / 13.5" |
| 2 | 92cm / 36" | 38cm / 15" |
| 3 | 98cm / 38.5" | 41cm / 16" |
| 4 | 104cm / 41" | 44.5cm / 17.5" |
| 5 | 110cm / 43.5 | 48cm / 19" |
Instructions
1. Print your pattern, make sure your printer is set to 'no scaling' or 'actual size'. First print page no. 2 alone if you are worried about your printers settings. Cut and put together your pattern pieces, matching up the numbers and letters on the page markers. You will see that on page 2, there is your missing rise piece, cut it out and paste to the right place.2. If you don't mind printing again, you can go ahead and cut the size you need. Or alternately, you can trace off the size you have chosen onto light sew in interfacing, to preserve the original pattern.
3. It is important to cut out 2 mirror image pieces of the pants legs. For the smaller sizes you will be able to fold the fabric in half and cut once, but for the size 4 and 5 it is important to flip the pattern piece when you cut the second leg.
For sizes 18m to 3 years, you can fit the pattern on 112cm (44") wide fabric folded in half selvedge to selvedge. The larger sizes you will need to cut one peice at a time. The larger sizes will need approximately 1.25m (1.5yards) of 112cm (44") wide fabric. This is an my own approximation and it is best for you to double check before you make a fabric purchase.
4. Once your fabric is cut, go ahead and follow yesterday's tutorial to pre-press your pattern pieces. The instructions to follow will assume you have done this.\
5. First step is to sew the back and front rise, fabric pattern right sides together.

Ignore any advice you have read that says you shouldn't pull a curved seam straight. It is much easier, and has no ill effects. These pictures are dramatic to show you my point, my hands would be in different positioning for actual sewing and not so far back.

6. Finish both seams. Here I have overlocked, but you can also use a zig zag stitch close to the edge. Here is a great post on different seam finishes. When I don't overlock, turn and stitch is a favourite of mine.

7. Next, it is time to press those seams open or to one side, depending on what seam finish you have chosen. Take care not to iron out your pre-pressed waistband. You can see here below that mine didn't line up perfectly, but no worries! When I refold it, it will find its own happy middle ground and settle in fine :)

8. Now we sew the inside leg seam, fabric right sides together.
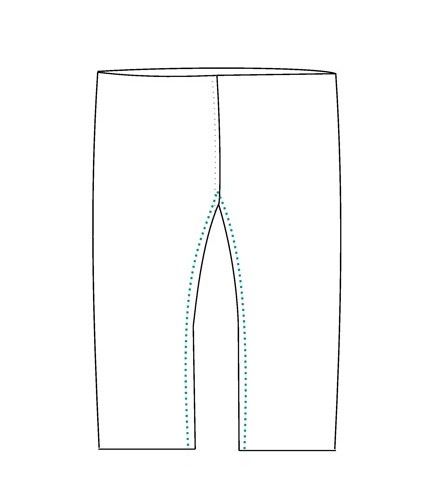

I only pin in one spot, the two rise seams which I would like to match nicely. If you are going to pin, start at this point and pin down each leg. But hey, give it a go without pinning, its not that bad :)
Go ahead and sew the inside leg seam.

9. Now prepare your waistband casing and hems to be sewn. Refold carefully on their pre-pressed creases, and iron once more just to set them in place.


You can see below I have pinned at the curve of the waistband, this is because it is the area most at risk for shifting while I am sewing. I don't pin the rest because I am confident its not going to move, I have pressed it really well and can hold the creases in place without pins. I have pinned the wrong direction here (oops). Your pins should face towards your presser foot as you are sewing, so that you can sew closely to them and remove them easily too. But you can pin in whichever way you please.

10. Now we are ready to sew them shut... Oh! And also, if you are not confident that you will remember to leave an opening for the elastic, please place vertical pins 2 inches either side of the centre back seam, in the waistband. This will clearly mark for you where to start and stop. And if you stuff it up and accidentally leave the gap at the front seam, who cares? Haha!

You are supposed to sew hems with the right sides facing up, but on PJ pants I ignore that advice. (The reason you are 'meant to' is because bobbin stitches never look as good as the top ones do).

I sew close to the edge by lining up the edge of the hem fold to the gap in the middle of my presser foot. Then I change the needle position a few clicks to the right. Now as I sew, if I just keep an eye out to make sure that the edge of the fabric is always lining up in the centre gap of my presser foot, the seam will sew nice and close to the edge.
11. Sew your hems closed, and sew the waistband, remembering to leave an opening for the elastic.


Measure some elastic around your child's waist and cut the elastic to a snug, but not too snug length. If you don't have a child to measure, the approximate waist measurements I have are:
18m - 18", 2y - 19", 3 - 19.5", 4 - 20", and 5 - 20.5".
These measurements allow a 1" overlap of the elastic. If you are unsure of size, check on a child before sewing the final gap closed.

Sew the ends of the elastic together using a zig zag stitch, going back and forth a few times.


Sew the opening shut, and your finished!


Any issues at all, please don't hesitate to contact me by email at: sewjereli (at) ymail (dot) com.
:) Make sure you come back and tell me how your Pj pants turned out!
x